I've been putting off talking about it explicitly in hopes I was wrong, but it seems that wheat officially causes eczema flare-ups for me, so I am cutting it out. This is why my last couple of recipes... scones, rice pizza... have been wheat-free. Sigh! No, it's good; it's very good to know how to control the eczema, because eczema sucks, right? And the kitchen chemist in me is very excited to experiment further with different types of flour (spelt behaves much like wheat, but buckwheat is heavier and seems to absorb liquids differently - hmmm!), so you'll see some evidence of that soon. I will be trying buckwheat tortillas (I hate working with corn flour) and will probably post my master list of weights for efficiently using your electronic scales (what?? You still don't have one?? They are $10 at Canadian Tire like every other month for a week, at least!), including some flours that are new for me. I'm also trying to soak/ferment grains more - inevitably, when you get into wheat-free, you end up reading primal and GAPS philosophy and recipes. It's fun, right? Yes.
Another weird change is that I have purchased unbleached organic WHITE flour again...! I know, I can't get over it myself. But Cure Tooth Decay argues very convincingly in favour of making white (unbleached) sourdough your go-to bread: the phytic acid in whole grains resides in the dark, oily, nutrient-rich bran of the kernels - so though that's where the nutrients are at, the phytic acid effectively blocks absorption of those nutrients. Soaking/fermenting/sprouting goes so far at unlocking the enzyme phytase, which sort of eats the phytic acid and makes the bioavailibility of the nutrients go up, but wheat is apparently quite tricky and the author just says to use white flour. Crazy. Anyway, since I'm not eating wheat, and Tony has a soft spot for white flour, I figure I can still tell myself I'm being Healthy And Responsible by doing it sourdough-style. For more on this, see this excellent entry on Kitchen Stewardship on why some experts recommend white flour, with a good amount of traditional/historical detail - which is super important to me - and yes, reading CTD, and this article, I do recall seeing anthropological images of, or reading biblical accounts of, pre-industrialized non-Western cultures sifting grain to create reduced-bran flours. Isn't this, like, in the pyramids? I'm pretty sure I've read or seen that hieroglyphics illustrate this process. It has tradition on its side! (Can you tell by the length of this paragraph that I am still sort of reeling from this decision, and maybe feeling a tad insecure?) The whole Kitchen Stewardship series on soaking grains is here, and if you want to get researchy, you can by the phytic acid research paper by Amanda Rose of Rebuild From Depression here. I also have it in a hard copy if you want to borrow it. Anywho, I am going to keep making the sourdough starter with whole wheat bread flour, but will be using unbleached white flour to make the loaves. So weird to say "out loud"!
So - just to be clear - I am NOT advocating Wonderbread!! I hope, and really, I do believe, that real sourdough bread is a world away from supermarket un-food imitation bread products.
Whew, so... that's what's cooking for us, lately!
Friday, September 28, 2012
Monday, September 24, 2012
brown rice pizza
 |
| Round one. |
 |
| See? Very ricey. Very grainy. |
 |
| Round two - now we're talkin! Before baking. |
 |
| Round two, after baking - hanging out on my flipped-over cookie sheet so I could slide it easily onto the baking stone once ready. |
 |
| Slices cooling (COOLING RACK IS ESSENTIAL). |
 |
| Yeah baby! Holding together say what!! |
So.
1 1/2 c brown rice
4 c water (yes, this is more than you'd usually use to cook this quantity of rice) (or, for bonus points - presoak your rice in 3 c water for 24-48 hours - it will be bubbly, and the rice will have absorbed about 1 cup of water - so save some of the soaking water as described in that link, then add back in 3 c to cook)
1 tbsp bacon fat or butter
a good pinch of salt
--> Throw it all together in a nice pot with a tightly-fitting lid, bring it to a boil, then reduce to low, cover, and simmer for one hour.
--> After one hour, remove the lid and tilt the pot. There should be no water escaping.
--> While still hot & moist: use your soup hand-blender to blend as much of the rice as you can. What you are actually doing here is creating a flour dough in reverse - normally you grind dry grains into flour, then add water, then knead that and call it a dough, yes? But here we first add the water to the whole grains, cook them, and then grind it into a dough, you follow? So once 50%-80% of the cooked rice has been mushed (the more the better, but it's not necessary to destroy each and every grain), set aside and let cool.
--> Once cool, preheat the oven to 400 F. Add one egg and 1 1/2-2 tsp of mixed herbs (I used oregano and basil), then mix into the rice mixture well.
--> Grease a cookie sheet. Plop on the rice mixture, spread around, then pat and pack down the dough into a crust shape (wet your hands with cold water often or it will stick like heck). Drizzle on some oil, then brush it around with a silicone pastry brush (or use your hands).
--> Bake about 30 minutes, until lightly golden at the edges.
-->There you go! Once you have your crust, spread on some of your favourite sauce and a mix of grated cheeses and whatever else you want, and you are good to go! Bake that another 20-30 minutes or so.
--> IMPORTANT: Once pizza is fully baked, let cool about 5-10 minutes on the pan/on the stone with the oven door open - then cut it into wedges/slices and transfer immediately to a cooling rack. Let it hang out there another 5-10 minutes before serving. Otherwise the moisture that is trying to escape from the bottom of the pizza as steam will be trapped and will make it soggy. This is bad enough with wheat pizza (I mean really, who likes soggy?), but with his crust it's imperative to avoid, because it can make the grains break apart from each other and you'll be left with... a flat rice casserole. Yeah. After you went to all this blending trouble!!
Bon appetit!!
Wednesday, September 19, 2012
uses for kefir
I'm always trying to get everybody into making and using kefir, so I thought I'd gather the main uses for it for those who are new to the art thereof.
1. Drink it straight. It is an acquired taste, but it's delicious. It makes a good snack. I consider eating fermented foods every single day to be essential to good health for everybody, universally, but especially if you or your loved ones are pregnant, nursing, have any kind of intestinal issues or immune system issues, y'all need to be consuming raw fermented foods.
2. Blend it into smoothies. It won't taste so sour for the faint-of-heart.
3. Use it in place of buttermilk in any recipe that calls for it (biscuits, pancakes, etc.).
4. Use it to soak grains (porridge, pancakes, waffles...).
5. Let the whey and curd separate fully, carefully tilt the jar, and let the whey trickle out. Use the whey to ferment things like salsa, lemon preserves, pickles and so on (use about 1 tbsp/500mL; be sure to also salt liberally and research lacto-fermentation before starting).
6. Once the whey has drained out, use the remaining firm curd as an alternative to sour cream - on potatoes, tacos, you name it. Delicious!
7. Use it to make a sourdough starter. Mix a cup of kefir with a cup of bread flour in a bowl, with a 1/4 tsp salt, cover, let stand 24 hours. Feed it 1 tbsp flour, stir, cover and let rest. repeat for a week or so. It should get bubbly.
Saturday, September 15, 2012
Scones 2.0
So called because I once gave Sam a different scones recipe - the main difference was that this one has double the butter. Trust me, ladies. It's the difference between "Oh cool, I made scones at home" and "THESE ARE THE BEST SCONES IN THE UNIVERSE."
So what are scones? Basically you are creating a beautiful hybrid between basic pastry (think buttery and flaky) and a leavened quick bread (think light & fluffy). You go about this by preparing as though to make pastry dough (rubbing butter into flour with salt) but adding a base (baking soda, in with the flour) and an acid (kefir, or another acidic dairy solution) so that they sort of explode into a golden delight in the oven.
So, without further delay...
Preheat the oven to 400 F. Put in your baking stone right away if you have one. If you don't have kefir, prepare your sour milk now (see below).
Combine:
2 c flour (about 300g whole wheat pastry flour or whole spelt flour; probably any flour would be fine)
1/2 tsp baking soda
1 1/2 tbsp xylitol or sugar (not honey - if you insist on using honey, mix it into the kefir, below), optional but recommended
1/2 c cold salted butter, cut into chunks
--> work these together as you would for making pastry, resulting in a mixture of rich, fatty flour with chunks of butter no larger than pea-sized.
--> stir in 3/4 c mature kefir*, buttermilk or sour milk (3/4 c milk + 1 tbsp vinegar or lemon juice, allowed to stand and curdle for about 10 minutes) until uniformly moist and holding together.
With clean hands, make the dough into a ball, then halve, then quarter it. Tear each quarter into three pieces, then roll each piece between your palms to make elegant, sweet little balls of dough. Once you have a dozen balls of dough, you're ready to go! Either pop them directly onto your baking stone (and really, if you don't have one yet, what are you waiting for?), spaced a couple of inches apart, or line them up 3 x 4 on a cookie sheet lined with parchment paper.
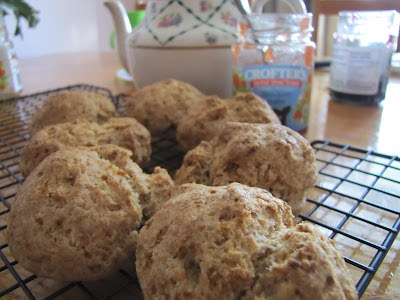
Bake about 25 minutes on the stone, or roughly the same time on a sheet. They can be dark gold like in this picture or a bit lighter.
Enjoy fresh, slathered with even more butter, and maybe some Crofter's fruit spread, and certainly a hot cup of tea!
*Note that store-bought kefir is not up to the challenge of sufficiently leavening these scones, as we discovered in the comments. I make my kefir so the curd and whey really fully separate before either drinking it, using it or refrigerating it. It should be quite tart. If in doubt, prepare sour milk, as described above.
So what are scones? Basically you are creating a beautiful hybrid between basic pastry (think buttery and flaky) and a leavened quick bread (think light & fluffy). You go about this by preparing as though to make pastry dough (rubbing butter into flour with salt) but adding a base (baking soda, in with the flour) and an acid (kefir, or another acidic dairy solution) so that they sort of explode into a golden delight in the oven.

So, without further delay...
Preheat the oven to 400 F. Put in your baking stone right away if you have one. If you don't have kefir, prepare your sour milk now (see below).
Combine:
2 c flour (about 300g whole wheat pastry flour or whole spelt flour; probably any flour would be fine)
1/2 tsp baking soda
1 1/2 tbsp xylitol or sugar (not honey - if you insist on using honey, mix it into the kefir, below), optional but recommended
1/2 c cold salted butter, cut into chunks
--> work these together as you would for making pastry, resulting in a mixture of rich, fatty flour with chunks of butter no larger than pea-sized.
--> stir in 3/4 c mature kefir*, buttermilk or sour milk (3/4 c milk + 1 tbsp vinegar or lemon juice, allowed to stand and curdle for about 10 minutes) until uniformly moist and holding together.
With clean hands, make the dough into a ball, then halve, then quarter it. Tear each quarter into three pieces, then roll each piece between your palms to make elegant, sweet little balls of dough. Once you have a dozen balls of dough, you're ready to go! Either pop them directly onto your baking stone (and really, if you don't have one yet, what are you waiting for?), spaced a couple of inches apart, or line them up 3 x 4 on a cookie sheet lined with parchment paper.
Bake about 25 minutes on the stone, or roughly the same time on a sheet. They can be dark gold like in this picture or a bit lighter.
Enjoy fresh, slathered with even more butter, and maybe some Crofter's fruit spread, and certainly a hot cup of tea!
*Note that store-bought kefir is not up to the challenge of sufficiently leavening these scones, as we discovered in the comments. I make my kefir so the curd and whey really fully separate before either drinking it, using it or refrigerating it. It should be quite tart. If in doubt, prepare sour milk, as described above.
Saturday, September 8, 2012
my little pets
My friend Julia told me this week that she finds my collection of SCOBYs and other fermentation projects amusing, like a little menagerie - my "pets", she called them. I found this cute.
See, it's true! This is tibicos (aka water kefir), my most recent acquisition, well-matured, fermenting lazily. You can see grains of the tibicos, as well as carbonation bubbles, floating around. It's kind of like having an aquarium, it has that same soothing quality as watching fish swim around. Except you don't have to feed tibicos smelly fish food, and every other day or so you get a delicious probiotic beverage!
See, it's true! This is tibicos (aka water kefir), my most recent acquisition, well-matured, fermenting lazily. You can see grains of the tibicos, as well as carbonation bubbles, floating around. It's kind of like having an aquarium, it has that same soothing quality as watching fish swim around. Except you don't have to feed tibicos smelly fish food, and every other day or so you get a delicious probiotic beverage!
Thursday, September 6, 2012
Putting up
Purchased 25 lbs of Roma tomatoes (and going back tomorrow for another 25lbs). With 20 lbs of cukes for bread and butter and dill pickles. 15 lbs of red peppers for roasting and freezing, 10 lbs of red and white onions, a huge bunch of fresh basil, and fresh dill that measures higher than my waist. All from this awesome little farm stand that I continuously go back to, Mr Poirier's in Mercier. That's how we do.


Subscribe to:
Posts (Atom)